Homemade Chocolate Peanut Butter Cups: Better Than Store-Bought
Have you ever taken a bite of a store-bought confection and immediately wished you could recreate that magic at home—only better? That’s exactly how I felt the first time I made my own Chocolate Peanut Butter Cups. Not only do you control every ingredient, but the flavor of a freshly made cup—silky dark chocolate shell, creamy peanut butter center—blows anything from a wrapper out of the water. Whether you’re a seasoned baker or a complete beginner, learning to make homemade peanut butter cups is a kitchen skill that pays off in rich, guilt‑free treats. Today I’ll walk you through a foolproof recipe that rivals even the iconic Reese’s Peanut Butter Cups, with tips to ensure perfect results every time.
—
Ingredients & Kitchen Tools
Ingredients
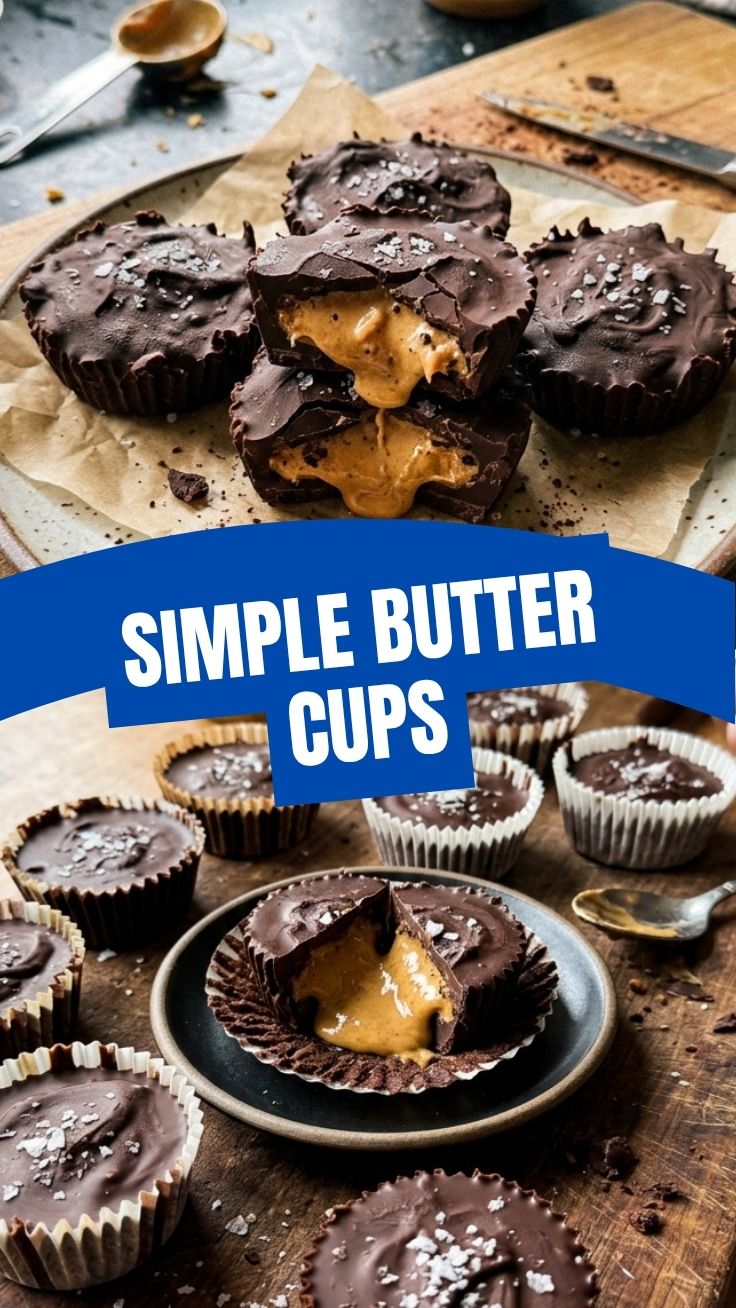
– 1 cup dark chocolate chips (60–70% cocoa) – provides deep flavor; semi‑sweet or milk chocolate work too.
– ½ cup creamy peanut butter – natural (no added sugar) yields a less sweet filling; use crunchy for texture.
– 2 tbsp coconut oil or cocoa butter – helps the chocolate set with a snappy, glossy finish.
– ¼ cup powdered sugar (optional) – for sweetness if using unsweetened peanut butter.
– Pinch of sea salt – balances sweetness and enhances chocolate notes.
Kitchen Tools
– Mini muffin tin (12‑cup) and paper liners – silicone molds work beautifully for easy release.
– Double boiler or microwave‑safe bowl – for gentle melting.
– Small piping bag or zip‑top bag with corner snipped – for neat filling layers.
– Spatula, measuring spoons, and a toothpick – to swirl or level tops.
Optional Substitutions
– Use almond butter or sunflower seed butter for nut‑free versions.
– Swap coconut oil for refined coconut oil if you dislike a faint coconut taste.
– Add 1 tbsp maple syrup to the filling for a natural sweetener option.
—
Prep Time & Cooking Schedule
– Prep Time: 15 minutes
– Cook Time: 10 minutes (melting)
– Chill Time: 30–60 minutes (per layer)
– Total Time: ~1.5 hours (mostly inactive chilling)
Plan ahead: because the cups require two chilling stages (first the chocolate shell, then the filling plus top layer), start at least two hours before you want to serve them. The active work is only about 25 minutes, so this is a perfect weekend project or a fun activity to do with kids.
—
Step-by-Step Instructions
1. Melt the first chocolate layer. In a double boiler (or microwave in 30‑second bursts), melt ½ cup chocolate chips with 1 tbsp coconut oil until smooth.
2. Line the muffin tin. Place paper liners in each cup. Spoon about ½ tablespoon of melted chocolate into each liner. Using a small brush or the back of a spoon, coat the sides up to the rim. Tap the pan gently to level.
3. Chill the shells. Place the tin in the freezer for 15 minutes until solid.
4. Prepare the peanut butter filling. In a bowl, stir ½ cup peanut butter with 2 tbsp powdered sugar (if using) and a pinch of salt. The mixture should be thick but spreadable. If too stiff, microwave for 10 seconds.
5. Fill and add the top chocolate. Spoon or pipe about 1 teaspoon of filling into each chilled shell, leaving a small gap at the top. Pour the remaining melted chocolate (rewarm if needed) over the filling to seal. This is where most home cooks rush—be patient! Pour slowly to avoid air bubbles.
6. Final chill. Refrigerate for at least 30 minutes until the tops are firm. Pop out the liners gently—you’ll hear a satisfying crack as the chocolate peanut butter cups release.
One key tip I learned after many batches: if your homemade peanut butter cups look dull, you either overheated the chocolate or didn’t temper it. For a shiny finish, use good‑quality chocolate chips (they contain stabilizers) or add a teaspoon of coconut oil to the melt.
—
Nutritional Benefits & Advantages
These homemade cups pack a nutritional punch compared to mass‑produced options. Dark chocolate is rich in antioxidants (flavonoids) that support heart health and reduce inflammation. Peanut butter provides plant‑based protein and healthy monounsaturated fats, which keep you satiated longer. By making your own, you skip preservatives, high‑fructose corn syrup, and artificial emulsifiers found in many commercial brands. A single cup (using dark chocolate and no added sugar) contains roughly 90–110 calories, 7g fat, 2g protein, and only 6g sugar—making it a smarter choice for a sweet craving.
—
Tips Variations & Cooking Advice
– Flavor twist: Add a pinch of cinnamon or cayenne to the chocolate for a spicy kick.
– Texture boost: Sprinkle flaky sea salt on top before the chocolate sets.
– Vegan/dairy‑free: Use dairy‑free chocolate chips and ensure your peanut butter is free of milk solids.
– Healthier swap: Replace powdered sugar with 1 tbsp maple syrup or a mashed ripe banana (reduce chocolate chill time slightly).
– Air fryer method? Not recommended—chocolate melts unevenly. Stick to oven or stovetop melting.
—
Common Mistakes to Avoid
– Overheating chocolate – it seizes and becomes grainy. Melt gently and never above 45°C (113°F).
– Skipping the salt – a tiny pinch in the filling dramatically lifts the flavor.
– Using runny natural peanut butter – it won’t set properly. Use a firmer kind or refrigerate it first.
– Pouring the top chocolate too hot – it can melt the filling and blur the layers. Let it cool to lukewarm (30–32°C).
– Not tapping the pan – air pockets make for brittle cups. Tap after each chocolate pour.
—
Storage & Meal Prep Tips
– Refrigeration: Store in an airtight container in the fridge for up to 2 weeks.
– Freezing: Wrap individually in parchment, then place in a freezer bag. They keep for 3 months. Thaw in the fridge overnight—don’t microwave (it ruins the texture).
– Reheating (if needed): These are meant to be eaten cold. If you want a softer center, let them sit at room temperature for 10 minutes.
Pro tip: make a double batch and freeze half. You’ll always have a quick, homemade treat on hand that’s far superior to anything from a convenience store.
—
Conclusion
Making chocolate peanut butter cups at home not only lets you tailor every flavor and texture to your liking but also gives you a healthier, more satisfying dessert. From controlling the sweetness to skipping artificial additives, the benefits are clear. My hope is that this recipe proves how simple and rewarding it is to craft your own homemade peanut butter cups—one perfect bite at a time. Give it a try, share a photo of your results, or experiment with one of the variations above. For more from‑scratch confections, browse our other desserts—you might just find your next favorite.
—
FAQs
1. Can I use milk chocolate instead of dark chocolate?
Absolutely. Milk chocolate will give a sweeter, creamier result. Reduce or skip the powdered sugar in the filling.
2. Why did my chocolate shells crack when I unmolded them?
That happens if the chocolate was too thin or if you used a low‑quality brand. Next time, add a teaspoon of coconut oil to strengthen the shell, and chill for at least 45 minutes.
3. How do I make these gluten‑free?
All ingredients listed are naturally gluten‑free. Just double‑check that your chocolate chips and peanut butter are certified gluten‑free if you have celiac sensitivity.
4. My peanut butter filling is too soft—what went wrong?
You likely used a “natural” peanut butter that’s high in oil. Stir it well or refrigerate it before mixing. Adding an extra tablespoon of powdered sugar can also firm it up.
5. Can I use silicone molds instead of paper liners?
Yes, silicone molds work great and release easily. You may need to increase chill time slightly because silicone conducts heat a bit slower.
—
Ready to ditch the store‑bought wrapper? Whip up a batch of these homemade cups tonight—you’ll never look at a candy aisle the same way again.