Why This Texas Beef Chili Will Become Your Cold-Weather Obsession
Have you ever craved a bowl so deep, so smoky, and so beefy that it feels like a campfire in a bowl? That’s exactly what authentic Texas Beef Chili delivers—and making it at home isn’t just rewarding; it’s a way to control every layer of flavor without the additives or fillers found in canned versions. Whether you call it chili con carne, red chili, or simply “the good stuff,” preparing this dish from scratch lets you dial in the heat, the texture, and the richness that no store-bought option can match. Once you taste the depth of slow-simmered beef and chiles, you’ll wonder why you ever settled for less.
—
Ingredients & Kitchen Tools
Ingredients (serves 6–8)
– Beef chuck (2½ lbs, cut into ½-inch cubes) – Marbling is key for tenderness.
– Dried ancho chiles (4) – Soaked and pureed; their earthy sweetness defines the chili.
– Dried guajillo chiles (2) – Adds brightness and mild heat.
– Canned fire-roasted tomatoes (14 oz) – Smoky, not too acidic.
– Beef broth (2 cups) – Use low-sodium to control salt.
– Yellow onion (1 large, diced) – Sweetens the base.
– Garlic cloves (5, minced) – Non-negotiable.
– Ground cumin (1½ tbsp) – Warm, earthy backbone.
– Smoked paprika (1 tbsp) – Deepens the campfire scent.
– Dried oregano (1 tsp, preferably Mexican) – Floral lift.
– Cayenne pepper (½ tsp, adjust to taste) – Heat level.
– Masa harina (2 tbsp mixed with ¼ cup water) – Thickener and subtle corn flavor.
– Salt & black pepper – To taste.
Kitchen Tools
– Heavy-bottomed Dutch oven (5–6 quart) – Holds heat evenly.
– Blender or immersion blender – For chile puree.
– Cutting board & sharp knife – Uniform cubes cook evenly.
– Wooden spoon – For scraping fond (browned bits).
– Small bowl – For masa slurry.
Optional Substitutions
– Beef short ribs instead of chuck – More gelatin, richer body.
– Canned chipotle in adobo (1–2) – Smoky heat boost.
– Homemade beef stock – Even more depth.
– Gluten-free – Masa harina is naturally gluten-free; ensure broth is GF.
—
Prep Time & Cooking Schedule
– Prep time: 25 minutes (chop beef, toast/soak chiles, dice onion, mince garlic)
– Active cooking time: 1 hour 15 minutes (brown beef, sauté aromatics, simmer)
– Resting time: 30 minutes off heat – This step is crucial for flavors to meld and the meat to relax.
– Total time: Approximately 2 hours 10 minutes
Plan ahead: The chili tastes even better the next day. Make it in the morning or the night before serving.
—
Step-by-Step Instructions
1. Prepare the chiles: Stem and seed the dried anchos and guajillos. Toast them in a dry skillet for 30 seconds per side until fragrant. Cover with hot water and soak for 20 minutes. Transfer to a blender with ½ cup soaking liquid and puree until smooth.
2. Brown the beef in batches: Heat 1 tbsp oil in the Dutch oven over medium-high. Season the beef cubes with salt and pepper. Sear in a single layer (don’t crowd) until deep brown on all sides, about 4–5 minutes per batch. Set aside.
3. Sauté aromatics: Reduce heat to medium. Add onion and cook until translucent (5 minutes). Stir in garlic for 1 minute. If the bottom has browned bits, deglaze with a splash of beef broth and scrape them up.
4. Bloom the spices: Add cumin, smoked paprika, oregano, and cayenne. Stir constantly for 45 seconds until fragrant. Be careful not to burn.
5. Combine everything: Return the browned beef to the pot. Add the chile puree, fire-roasted tomatoes (crush them with your hand first), and remaining beef broth. Bring to a gentle simmer, then reduce heat to low.
6. Simmer low and slow: Cover and cook for 1 hour, stirring occasionally. Uncover for the last 15 minutes to thicken. The meat should be fork-tender. Texas Beef Chili relies on patience—rushing the simmer will leave you with tough cubes.
7. Thicken with masa: Stir the masa slurry into the chili. Simmer uncovered for another 10 minutes, stirring often. The chili should coat a spoon without being pasty. Taste and adjust salt and cayenne.
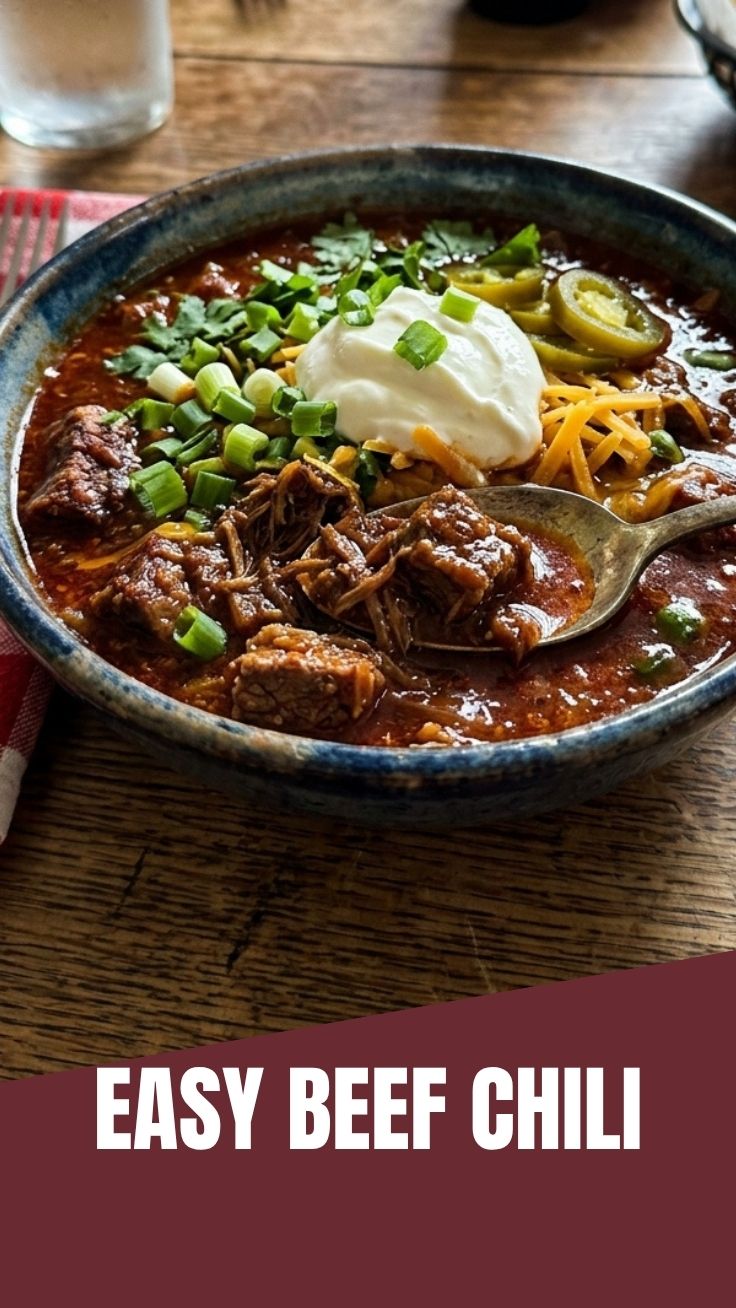
8. Rest and serve: Remove from heat and let stand for 30 minutes. Stir once before serving. This dish is a classic Chili con carne at its most honest: meat, chiles, and time. Garnish with cilantro, diced onion, or shredded cheddar if desired.
—
Nutritional Benefits & Advantages
– High-quality protein – Beef provides complete amino acids for muscle repair and satiety.
– Rich in iron and zinc – Ancho and guajillo chiles also contribute minerals that support immunity.
– Capsaicin from chiles – Boosts metabolism and may reduce inflammation.
– No refined grains or fillers – Unlike many canned chili versions, this recipe relies on real ingredients.
– Low carbohydrate – Around 12g net carbs per serving, making it suitable for keto or low-carb diets.
—
Tips Variations & Cooking Advice
– Flavor twist: Add 1 oz of dark chocolate (70%+) and a shot of espresso during simmering for Mexican-inspired depth.
– Bean lovers? Traditional Texas chili purists say no beans, but you can fold in 1 cup of cooked pinto beans at the end.
– Smokier profile: Use 2 chipotle peppers in adobo instead of cayenne.
– Dairy-free / gluten-free: This recipe is naturally dairy-free and GF (verify broth labels). Serve with avocado instead of cheese.
– Instant Pot option: After browning, pressure cook on high for 25 minutes, natural release 10 minutes, then thicken with masa on sauté.
—
Common Mistakes to Avoid
– Skipping the browning step – Without deep searing, you lose the Maillard reaction that builds savory complexity.
– Adding all liquid at once – Too much liquid drowns the chili; start with less broth and add only if needed.
– Not resting the chili – Freshly finished chili tastes flat. The 30-minute rest allows fat and flavor to redistribute.
– Over-thickening with masa – The slurry should be thin; pour it in slowly and watch the consistency. You can always add more, but you can’t take it out.
– Using pre-ground chili powder – Whole dried chiles offer dramatically better flavor and texture.
—
Storage & Meal Prep Tips
– Refrigerate: Store in an airtight container for up to 5 days. The flavor deepens over the first 2 days.
– Freeze: Portion into freezer-safe bags or containers (leave ½-inch headspace). Freeze for up to 3 months. Thaw overnight in the fridge.
– Reheat: In a saucepan over medium-low heat, adding a splash of broth if too thick. Avoid microwaving on high, which can toughen the meat. Stir occasionally until steaming.
– Meal prep: Cook a double batch on Sunday. Divide into individual containers for lunches. Add toppings fresh each time.
—
Conclusion
When you simmer a pot of authentic Texas Beef Chili, you’re not just making dinner—you’re crafting a tradition that fills your home with the kind of low-and-slow aroma that brings people to the kitchen. The beauty of this dish lies in its simplicity: quality beef, dried chiles, and a few pantry staples. Whether you serve it with cornbread, over rice, or straight up with a spoon, it delivers the soul-warming comfort that only a true Chili con carne can. Give it a try this weekend, and don’t forget to share your results or tag us when you do. Your future self—sitting down to a bowl on a chilly evening—will thank you.
—
FAQs
1. Can I use ground beef instead of cubed chuck?
Yes, but the texture will be very different. Use 80/20 ground beef and sauté until crumbled before adding liquids. The chili will be more uniform and less rustic.
2. How do I control the spice level?
Start with ½ teaspoon cayenne and one chipotle. Remove seeds from any fresh chiles you add. For less heat, use only ancho chiles (mild and sweet). For more, add a habanero.
3. Why is my chili bitter?
Probably from scorching the dried chiles during toasting. Toast them only until fragrant (30 seconds per side), not until they darken. Also, ensure you remove all seeds.
4. Can I make this in a slow cooker?
Absolutely. After browning the beef and sautéing aromatics on the stovetop, transfer everything to the slow cooker. Cook on low for 6–8 hours or high for 4 hours. Add the masa slurry in the last 30 minutes.
5. What’s the best way to reheat frozen chili without ruining the texture?
Thaw in the fridge overnight. Reheat gently in a pot over medium-low heat, stirring occasionally. If the chili thickens too much, add a little beef broth. Avoid high heat; it can make the meat stringy.